Rogue's Level Generation
I really like procedural generation and was curious as to how Rogue generated their levels. Since Rogue is open source I dived into to the code and disected extactly how they did it. My goal of this write up is to explain how they accomplished it with a bottom up explaination. I’ve ommited details that add complexity and don’t contribute much to the intution. An example of an omission is Maze rooms since they require a understanding of the basics first before being added.
Room Placement
A room consists of a position (x,y), which is the top left corner, and a dimension (width, height).
Rogue has a limit of nine room locations, distributed over a 3-by-3 grid with
the dimension of each grid cell being the floor of NUMLINES/3 and floor of NUMCOLS/3.
The default configuration for NUMLINES and NUMCOLS is 24 and 80, so each cell has a dimension of (26, 8).
From this point onwards, I’d be assuming default values.
The top left coordinate, (x,y), for the i-th room (0-indexed) can be computed using integer arithmetic.
x = (i % 3) * 26 + 1
y = (i / 3) * 8
Which results in the following values for the nine rooms.
|   i   |   x   |   y   |
|-------|-------|-------|
|   0   |   00  |   00  |
|   1   |   27  |   00  |
|   2   |   53  |   00  |
|   3   |   00  |   08  |
|   4   |   27  |   08  |
|   5   |   53  |   08  |
|   6   |   00  |   52  |
|   7   |   27  |   52  |
|   8   |   53  |   52  |
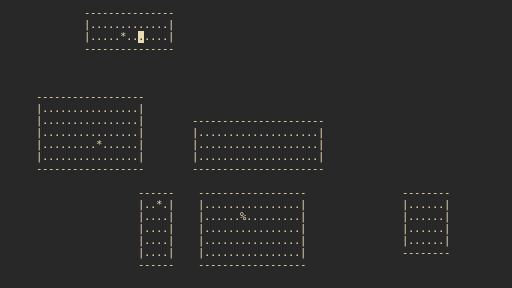
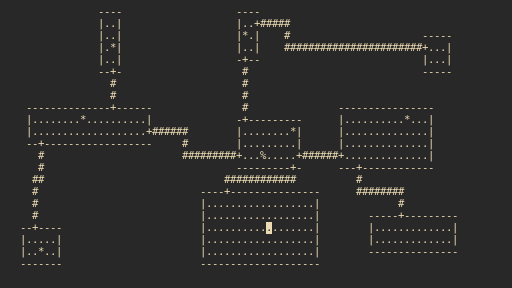
Lets set width and height to each room to (26, 8) to maximize area used but doesn’t allow paths between each room. This allows us to generate a basic level as shown.
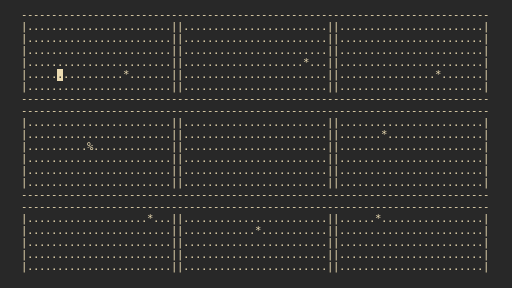
This is a good start but if every level was like this a player would get bored very quickly, we
can make this interesting by randomly give each a room a random dimension and offset the position.
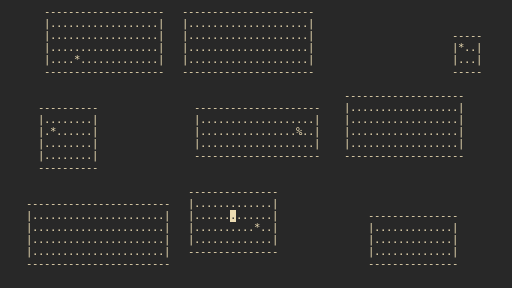
In Rouge this is accomplished with each room’s width randomly generated from the range (4, 26)
and the height from the range (4, 8), which gives us a new dimension of (width, height) for the room.
The room offset (X, Y) is dependent on the dimension of the room, where
the X offset is in the range of (0, 26 - width) and the Y offset in the range of (0, 8 - height).
This produces a more variation in the level design.
This is a large improvement over the basic level generation but a player would still learn that each level contains 9 rooms and their relative location to one-another. To decrease predictability Gone rooms are introduced.
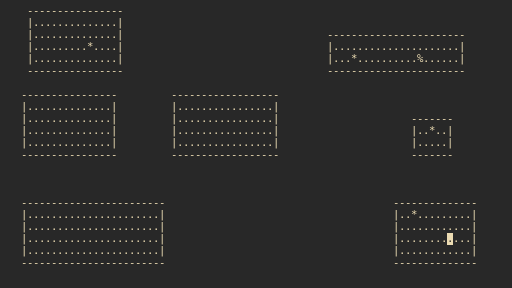
Gone Rooms
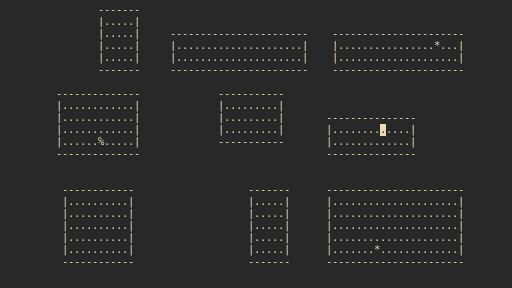
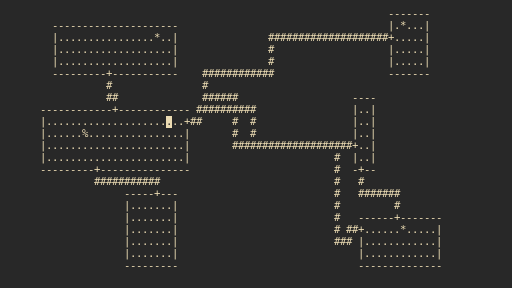
Let introduce a new variable to our rooms called gone.
If gone is set, the room still has a location but it does not have any dimensions, and the room is not visible.
The offset for a Gone room is in the range of (1, 24) for X and in the range of (1, 6) for Y.
The position of a Gone room is used during tunnelling.
In rouge each level can have zero to four Gone Rooms and produces levels that look like the following.
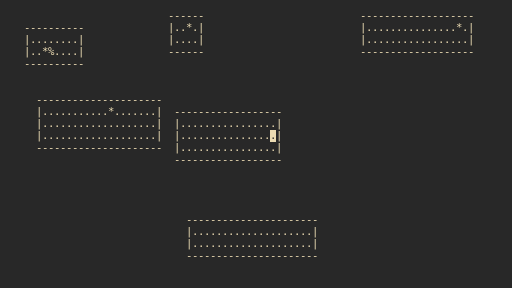
Tunneling
We will omit Gone rooms initially to help ease our understanding. Our goal with tunneling is to ensure that the player can visit every available room in a level. Rogue achieves this with a graph data structure that stores if rooms that are neighbours, if two rooms are connected, and if a room is in the graph. When a level is initially generated, zero rooms are in the graph and no rooms are connected. The table below captures the neighbour relationship where rooms (i, j) are neighbours if the table contains a 1, or 0 if they are not neighbours.
| i | 0 | 1 | 2 | 3 | 4 | 5 | 6 | 7 | 8 |
|---|---|---|---|---|---|---|---|---|---|
| 0 | 0 | 1 | 0 | 1 | 0 | 0 | 0 | 0 | 0 |
| 1 | 1 | 0 | 1 | 0 | 1 | 0 | 0 | 0 | 0 |
| 2 | 0 | 1 | 0 | 0 | 0 | 1 | 0 | 0 | 0 |
| 3 | 1 | 0 | 0 | 0 | 1 | 0 | 1 | 0 | 0 |
| 4 | 0 | 1 | 0 | 1 | 0 | 1 | 0 | 1 | 0 |
| 5 | 0 | 0 | 1 | 0 | 1 | 0 | 0 | 0 | 1 |
| 6 | 0 | 0 | 0 | 1 | 0 | 0 | 0 | 1 | 0 |
| 7 | 0 | 0 | 0 | 0 | 1 | 0 | 1 | 0 | 1 |
| 8 | 0 | 0 | 0 | 0 | 0 | 1 | 0 | 1 | 0 |
To simplify the explanation, I will explain the process for digging a tunnel between rooms 0 and 1 and then generalize from there.
Let r0 and r1 be the structures for room 0 and 1. Recall that the structure of a room
consists of a position (x, y), and a dimension of (width, height). The x coordinate of r1
is denoted r1.x.
When connecting two rooms we need to add a door to both rooms, one door on the right side of
room 0 and one door on the left side of room 1. For r0 the x-coordinate of the door is ‘r0.x + r0.width’ and
the y-coordinate is in the range of (r0.y + 1, r0.y + height - 1) and for r1 the x-coordinate of the door is ‘r1.x’ and
the y-coordinate is in the range of (r1.y + 1, r1.y + height - 1). 1 is added and subtracted to account for the bounding
walls of each room. Thus each door has coordinates (x,y) and let d0 be the door for r0 and d1 be the door for r1.
Now our tunnel is between d0 and d1 and we know that d1 is to the right of d0 and that d1 is either
above, below, or at the same level as d0. Let distance be ‘abs(d1.x -d0.x)’
so we must move distance blocks to the right so we define delta equal to (1, 0).
Similarly for the y-axis define turn_distance be ‘abs(d1.y - d0.y)’, the number of blocks that we must move along the y-axis however
the tunneler doesn’t know which y-direction it should move so if d0.y < d1.y, then the tunneler moves upwards
and define delta_turn to be (0, 1), otherwise the tunneler moves downwards and delta_turn is (0, -1).
When tunneling begins, the tunneler move a long the x-axis, however at some point it must
turn an tunnel along the y-axis. Let turning_point be a random number in the range of (0, distance) and the tunneler reaches this point
it tunnels the distance of turn_distance on the y-axis and returns to tunneling along the x-axis.
With all of these variables defined we can finally begin tunneling. The tunneler’s
position is set to d0 and for each distance it moves by a delta step and places a block.
If distance equals turning_point then we are at the turning point so we tunnel along the y-axis
by turn_distance with delta_turn step and place a block.
The pseudo code looks like this
let curr be the coordinates of the tunneler.
curr.x = d0.x;
curr.y = d0.y;

while(distance > 0) {
    curr.x = curr.x + delta.x;
    curr.y = curr.y + delta.y;
    place_tunnel_block(curr);
    if(distance == turning_point) {
        while(turn_distance > 0) {
            curr.x = curr.x + delta_turn.x;
            curr.y = curr.y + delta_turn.y;
            place_tunnel_block(curr);
            turn_distance--;
        }
    }
    distance--;
}
Now if you understand tunneling between rooms 0 and 1, we can generalize tunneling
between any neighbours.
Let ri1 and ri2 be the index of the two rooms we wish to connect and
r1 and r2 be the room data corresponding the indices ri1 and ri2.
First we determine the general direction of tunneling.
If ri1 > ri2 swap ri1 and ri2, this ensure that we are only tunneling
rightwards or downwards. Rightwards tunneling occurs if ri1 + 1 == ri2 and
if ri1 + 5 == ri2 we are tunneling downwards. Note that the neighbours relationship
is designed to ensure that one of the previous cases occurs so a tunnel will either
be rightwards or downwards. When tunneling rightwards use the example between
rooms 0 and 1. When tunneling downwards generate doors d1 and d2, with d1 on the bottom
wall of r1 and d2 on the top wall of r2. Let distance be ‘abs(r1.y - r2.y)’ with
delta equal (0, -1), turn_distance set to ‘abs(r1.x - r1.y)’ with
delta_turn set to (1, 0) if d1.x < d2.x otherwise set to (-1, 0), then use
the same tunneling procedure as before.
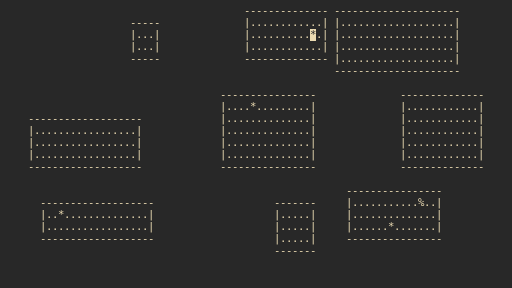
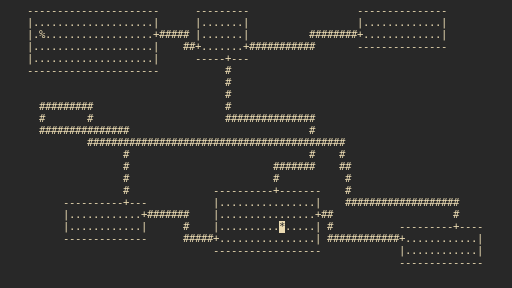
When all the rooms are connected and tunnels are dug, levels look like this.
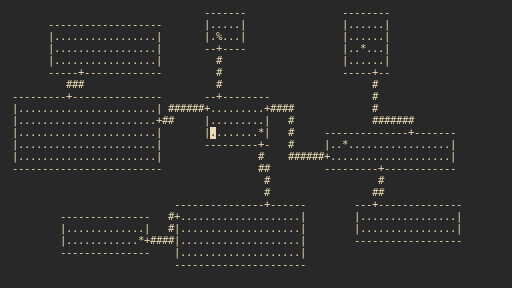

Gone Rooms
Rogue uses Gone rooms as a connectivity point. Recall that Gone rooms do not have any dimensions but they still have a position. Doors are only generated for rooms that are visible. Thus when connecting two rooms we have the following cases.
- Visible Visible
- Visible Gone
- Gone Visible
- Gone Gone
Case 1 is handled, cases 2 and 3 are similar, and 4 requires further investigation. For cases 2 and 3 we generate a door for the visible room and create a tunnel between the door and the Gone room’s position. For case 4 we simply create a tunnel between each Gone room’s positions which is the same as connecting two doors.
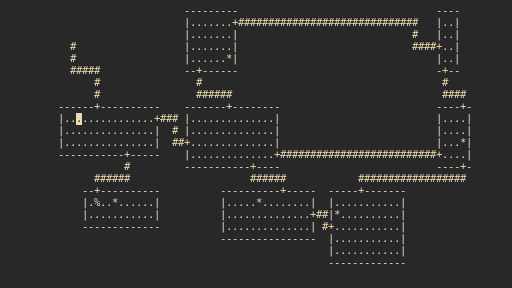
Notice that passages with dead ends emerges from the fact that each room must be connected, which is visible in the third image. Also try to see if you can locate where each Gone room’s position based on the tunnelling.